Why Push Notifications?
Push notifications are used to re-engage passive users to the app again or conveying information about new content or products which are available in app. These push notifications can be created using the On-Demand Portal or through APIs. A separate Marketing Cloud license also provides different way of delivering push notifications through DPS.
We have different delivery options like, 'notifications which can send the message only to phone users', or by 'scheduling a delivery time'.
Types of push notifications:
Background notifications: Which download a specific item or collection.
Text notifications: Which sends a text message to users to notify something.
Need to create push notifications for Android and iOS independently. Below methods are used for the same.
There are four steps involved in sending push notification in Android.
Step 1:
Configure Google Cloud Messaging.
1) Go to https://developers.google.com/mobile/add?platform=android
2) Enter values for option as below 'Create a new app or choose an existing app.'
App Name: A name for your app service
Android Package Name: package name that you use for Bundle ID in On-Demand services (Project settings>Access>Entitlement & Authentication>Bundle ID)
3) Click 'Choose and Configure Services'
4) Select Cloud Messaging, and then 'Enable Google Cloud Messaging.'

5) Create the config file by selecting 'Generate configuration files.'
6) Keep back up of 'Server API Key' and 'Sender ID' values
7) Download the configuration file by clicking on 'Download google-services.json'

Step 2:
Configure Notification Section
1) Go to 'Notifications.'
2) Select the project which you want to update, and click Push Credentials. Then click the Android tab.
3) Select the Android app you created, and then click Add Credentials.

Specify the Server API Key and Project Number (Which you backed up in previous section step 6).
Step 3:
Building an Android app and sign it.
1) Login to On-Demand Portal and re-check 'Bundle ID' which is configured for 'Step 1, Android package name is matching project's bundle id.
2) Go to on demand Apps> App Details Tab, 'Android Push Notifications', then select 'Enable push notifications '
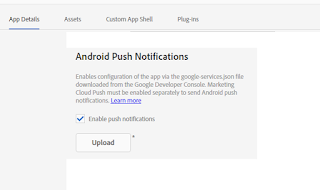
3) Click Upload, select the JSON file downloaded from the Google Developer Console.
4) Build , Sign, install the app on your android device.
Step 4:
Send the text notifications :

1) Click Notifications, and then click Android > Click Create > Text Notification>Details : mention below details
Destination App ID: The app which you need to send notification for
Text Notification Message: Enter the text notification message which needs to be send to users.
2) Click Delivery Options, and specify the following options:
Notification Audience: At present the options are All users, phone, tablet, users who are not app-online for a month.
Delivery Time: Immediate/ scheduled based on time zone,date time.
3) Click Create to send or schedule the message notification.
The Text notifications appear on any Android device in which the app is installed(user must have opted in to receive push notifications).
Notes:
Various options in AEM integrated with AEM Mobile On-Demand Portal
Add/MAP user to AEM Mobile project
Create Article/Banner from AEM and publish it to AEM Mobile
Integrate AEM with AEM Mobile
Create an APP in AEM And Mapping with AEM Mobile On-Demand
AEM Mobile Interview questions for developers
Adjusting Home Navigation Menu from AEM Mobile On-Demand portal
Push notifications are used to re-engage passive users to the app again or conveying information about new content or products which are available in app. These push notifications can be created using the On-Demand Portal or through APIs. A separate Marketing Cloud license also provides different way of delivering push notifications through DPS.
We have different delivery options like, 'notifications which can send the message only to phone users', or by 'scheduling a delivery time'.
Types of push notifications:
Background notifications: Which download a specific item or collection.
Text notifications: Which sends a text message to users to notify something.
Need to create push notifications for Android and iOS independently. Below methods are used for the same.
- Apple Push Notification Service (APNS) for iOS apps.(Support both text notifications and background notifications)
- Google Cloud Messaging (GCM) for Android apps. (Support only text notifications)
There are four steps involved in sending push notification in Android.
- Configure your app for Google Cloud Messaging using the Google Developer Console.
- Configure notifications section of the On-Demand Portal.
- Build the Android app with push notifications enabled.
- Send the text notification.
Step 1:
Configure Google Cloud Messaging.
1) Go to https://developers.google.com/mobile/add?platform=android
 |
| Click on image to see it big |
2) Enter values for option as below 'Create a new app or choose an existing app.'
App Name: A name for your app service
Android Package Name: package name that you use for Bundle ID in On-Demand services (Project settings>Access>Entitlement & Authentication>Bundle ID)
3) Click 'Choose and Configure Services'
4) Select Cloud Messaging, and then 'Enable Google Cloud Messaging.'

5) Create the config file by selecting 'Generate configuration files.'
6) Keep back up of 'Server API Key' and 'Sender ID' values
7) Download the configuration file by clicking on 'Download google-services.json'

Step 2:
Configure Notification Section
1) Go to 'Notifications.'
2) Select the project which you want to update, and click Push Credentials. Then click the Android tab.
3) Select the Android app you created, and then click Add Credentials.

Specify the Server API Key and Project Number (Which you backed up in previous section step 6).
Step 3:
Building an Android app and sign it.
1) Login to On-Demand Portal and re-check 'Bundle ID' which is configured for 'Step 1, Android package name is matching project's bundle id.
2) Go to on demand Apps> App Details Tab, 'Android Push Notifications', then select 'Enable push notifications '
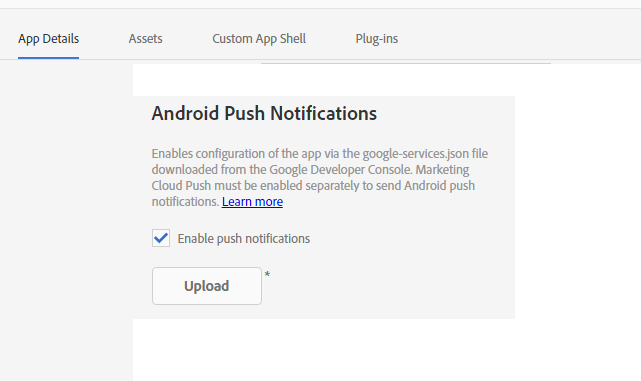
3) Click Upload, select the JSON file downloaded from the Google Developer Console.
4) Build , Sign, install the app on your android device.
Step 4:
Send the text notifications :

1) Click Notifications, and then click Android > Click Create > Text Notification>Details : mention below details
Destination App ID: The app which you need to send notification for
Text Notification Message: Enter the text notification message which needs to be send to users.
2) Click Delivery Options, and specify the following options:
Notification Audience: At present the options are All users, phone, tablet, users who are not app-online for a month.
Delivery Time: Immediate/ scheduled based on time zone,date time.
3) Click Create to send or schedule the message notification.
The Text notifications appear on any Android device in which the app is installed(user must have opted in to receive push notifications).
Notes:
- As of now push notification does not allow linking to a specific collection. Cancel option is available for scheduled push notification, if a scheduled text notification has not yet been sent.
- If we need to send message to users within the app, we can use In-App Messaging(Which is part of Mobile Marketing SDK). In-App Messaging is a premium product.
Read More:
Add/MAP user to AEM Mobile project
Create Article/Banner from AEM and publish it to AEM Mobile
Integrate AEM with AEM Mobile
Create an APP in AEM And Mapping with AEM Mobile On-Demand
AEM Mobile Interview questions for developers
Adjusting Home Navigation Menu from AEM Mobile On-Demand portal
No comments:
Post a Comment
Note: only a member of this blog may post a comment.