Thursday, 9 March 2017

AEM Mobile with Login Functionality

Custom authentication Using Generic Identity Provider in AEM Mobile

AEM Mobile supports different ways of Sign in in to the application. Below are the three methods which can be integrated for AEM Mobile login functionality.
  • SAML 2.0 (Gigya, MFA/OKTA)
  • OAuth 2.0 (Facebook, Google id's)
  • Generic
AEM Mobile fetches authorization tokens from these identity providers, which you can use in your entitlement service to authorize users to content. AEM Mobile provides many APIs for Sign in procedures; For eg 'setAuthToken' 'isAuthenticated', 'launchSignInUI' etc.

Here we are going to understand the Generic identity provider implementation and it supports two types of login. First one is using a separate HTML form which is hosted in internet and second method using Sign-in in experience in an AEM Mobile article itself.

Generic Identity Provider Implementation.

Click on image to see it big


When users tap on Sign In button from the AEM Mobile app menu, the users are redirected to the provided sign-in UI. The Sign In HTML will have login functionality written, so that the code calls the DB and verify the user information and if it is a successful login, the user is redirected to app Home page with additional authToken Parameters. The authToken can be any String which holds multiple values related to User like user id, user location, user preferences etc.

The token can be a JSON file(Stringify this before passing to AEM Mobile as authToken) as given below. In AEM Mobile app, we can retrieve this authToken and read values, and use this values if required to set some additional features. For eg. say we need to set articles based on Geo of 'LA', so that only LA user will be able to see this content after login. We can send the authToken with below JSON and check in app for geo location. If it matches the geo 'LA' then display the article.

{
    "UserArray":[{
            "UserName":"user1",
            "userGeo":"LA",
            "userAge":"23",
            "userLastLogIn":"04-04"
        }
        
    ]
}  

Steps involved in setting up Generic Identity Provider.

Step 1: Create Login HTML

Create HTML Page with login functionality. Below given a sample HTML form page.

<html>
<head>
</head>
<body>
<form method="post" onsubmit="login();">

<input type="text" name="username">
<input type="password" id="password">

<input type="submit" value="Login" />

<script>
//You code which will call login functionality and verify the submitted user credentials by invoking DB.
// If login is success set the authToken and redirect the user from Login UI page to app home page.
//A sample code is available in next page of the blog. Parameters involved in Sign In and Login Scripts
</script>
</body>
</html>

Step 2: Host the Login HTML in you internet site.

We can place the login HTML to any internet facing site, so that we will have a new login URL like www.yourdomain.com/login.html. Ensure this is accessible through app.

Step 3: Configure the Identity Provider

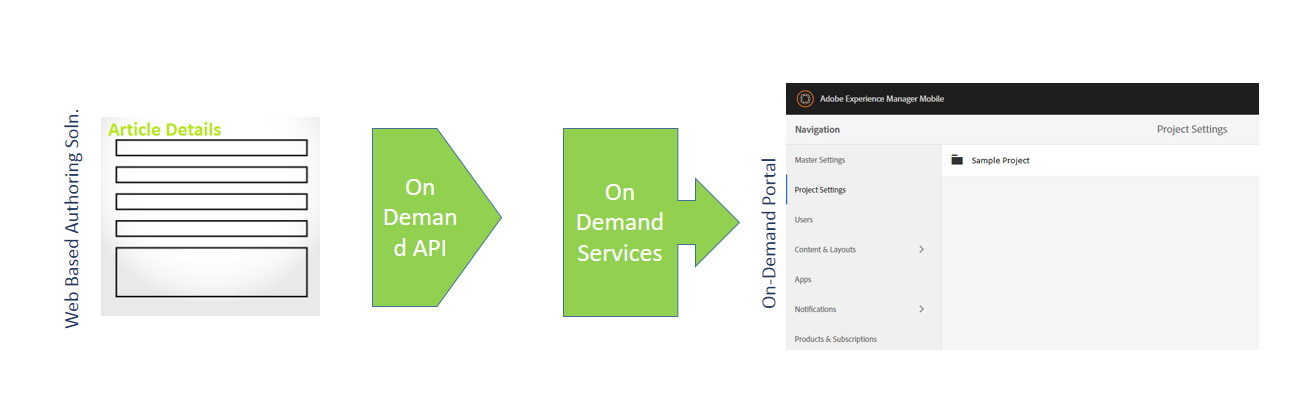
Once the Login UI is ready and hosted, get the URL. Go to Master Settings of On-Demand portal > Identity Providers tab

Identity Provider Name: Generic 
Identity Provider Type: Generic

In the next 'Generic setup' screen, provide below details.

Authentication URL *: The URL Where you have hosted the login UI.
Default Session Expiry : You can leave this blank (Number of seconds that a successful sign-in is valid)

Save the configuration.

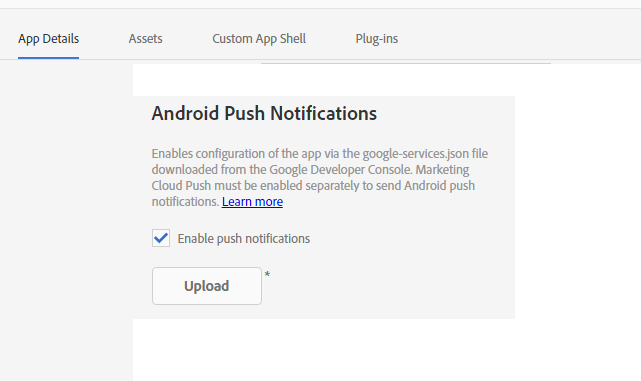
Step 4: Enable Custom Authentication in On-Demand portal
  • Go to project Settings in On-Demand Portal > Select the project to be edited, click on Edit and go to 'Access' tab.
  • Enable the check box under section 'Custom Authentication'
  • Select identity provider 'Generic'
  • Add a bundle ID under section 'Entitlement & Authentication' (This ID will be sent when apps request entitlement or authentication information)

Step 5: Build the app(not a preflight app) sign it, and test it as described here.

Read : Parameters involved in Sign In and Login Scripts

Read More:

 Various options in AEM integrated with AEM Mobile On-Demand Portal

 Add/MAP user to AEM Mobile project

 Create Article/Banner from AEM and publish it to AEM Mobile

 Integrate AEM with AEM Mobile

 Create an APP in AEM And Mapping with AEM Mobile On-Demand

 AEM Mobile Interview questions for developers

 Adjusting Home Navigation Menu from AEM Mobile On-Demand portal

Authoring AEM Mobile Article from Custom Third party applications.


AEM Mobile on-Demand portal allows third party application authoring though the APIs provided. We can have either a CMS plugin(wordpress or joomla) which talks to the API or a complete Web-based authoring solution for the same.


Using the on-Demand API's services, we can manage:
  1. Articles
  2. Collections
  3. Products
  4. Push notifications
Authoring Orchestrator
Let us see the steps involved in setting up a web based authoring application system (I call it 'Authoring Orchestrator') for AEM Mobile. One of the major condition to run this application is that we need a public hosted server so that our application files can be deployed over internet.

Step 1:

Download the On-Demand Services API files : This set of files contains API Documentation, Examples etc.

Step 2:

Get the API Keys, generate Device ID, Device Token

To access the On-Demand Services API, you need to request an API key through the form specified. If you need further assistance, please let us know thorough the comment section.

Step 3:

Update /aemmobile-api-examples/config/credentials.php for below details

i) Update the values for ‘client_id' (with API Key), 'client_secret';
ii) Update the value for 'device_token', 'device_id' received from the AEX service.
iii) Provide a value for 'client_version' (It can be like 'aemmobile-orchestrator-api-doc-1.0');

Step 4:

Deploy the file folder in hosted server so that files are available over internet. The url could be
www.yourserverpath/aemmobile-api-examples/demo/index.php

Step 5:

Test the set up.
We can call the test file using below url

www.yourserverpath/aemmobile-api-examples/demo/01_get_access_token.php

This url returns back the access token if your set up is correctly configured.

Copy the 'access_token' returned in previous example and update file /aemmobile-api-examples/config/credentials.php

Now access www.yourserverpath/aemmobile-api-examples/demo/02_get_user_permissions.php, which returns the project id.

Update the file /aemmobile-api-examples/config/parameters.php 'publication_id' with previously retrieved project ID.

Now call www.yourserverpath/aemmobile-api-examples/demo/03_update_home_collection.php will return the top-level collections.

We can call all tests provided at www.yourserverpath/aemmobile-api-examples/demo/index.php in a similar manner.

Above tests ensures that we have configured the 'Authoring Orchestrator' correctly.

Step 6: 

Create a form(which can be HTML or PHP) which takes the article details and post it to relevant API.

In this case you need an html or PHP form which takes all article meta-data like Article Name, Article Title etc. On submission, you need to post this data by referring relevant on-demand API file.

For eg: If we are creating a new article we need to post the data to '/aemmobile-api-examples/article/create_article.php'

Once the article is created, we can have similar operation for image updation and .article file upload for the newly created article.

This 'article' folder contains article operations like, create article, delete article, get article list, get article metadata, publish article, upload article etc.

Similarly there are many directories which helps us to operate on authentication, banner, card, collection, image, layout, project etc.

Facing difficulty in configuring on-Demand API? Let us know through comments.

Read More:

 Various options in AEM integrated with AEM Mobile On-Demand Portal

 Add/MAP user to AEM Mobile project

 Create Article/Banner from AEM and publish it to AEM Mobile

 Integrate AEM with AEM Mobile

 Create an APP in AEM And Mapping with AEM Mobile On-Demand

 AEM Mobile Interview questions for developers

 Adjusting Home Navigation Menu from AEM Mobile On-Demand portal

Angular JS Implementation for AEM Mobile Articles

AngularJS Articles in AEM Mobile

AEM Articles are normal HTML articles and it supports any front end technology, which a normal web page supports.

In this post, we will see how we can create an Angular JS article in AEM Mobile.

What is AngularJS?

Angular JS is a new Javascript technology which can be added to any HTML by adding relevant Angular library inside <script> tag.
Angular adds Directives to HTML page, and binds data to page with Expressions.

How to add AngularJS in an article?
AEM Mobile article structure contains an index.html with js, css, images, lib folders. This structure is used to create .article file using AEM Mobile packager.

Steps to create angular article:

  • Get Angular

We need to get latest AngularJS library from AngularJS website. Download 'angular.min.js' and any required angular additional libraries to your /js directory in article folder.


  • Create Controller

Now create a file controller.js in /js folder and add below code.

<!--Your Controller.js-->


var app = angular.module("myFirstAngular",['ngSanitize'], function ($compileProvider) {

  $compileProvider.aHrefSanitizationWhitelist(/^\s*(https?|ftp|mailto|file):/);

});
app.controller("controller",function($scope,$window,$sce){
 
$scope.personsList =[
                {name:'John',age:'23'},
                {name:'Jannet',age:'24'},
                {name:'Mark',age:'25'}              
                ];
                }
                );
             

  • Update index file of article to involve AngularJS in article  

         
Add angularJS libraries in your index.html. Below we have added sanitizor also which helps to sanitize the urls.
             
        <head>          
            <script src="js/angular.min.js"></script>
            <script src="js/angular-sanitize.min.js"></script>
        </head>
  • Define body element which refers the controller and app.      

        <!-- Body-->
        <!-- ng-app defines an AngularJS application below-->
        <!-- ng-controller defines the application controller below-->
        <body ng-app="myFirstAngular" ng-controller="controller">
  • Add AngularJS code (which is of syntax 'ng-')
        <!--Div -->
        <!--ng-repeat repeats a set of HTML, a given number of times-->
        <div ng-repeat="person in personsList">
                        <div class = "your class">
                            <p class="name">{{person.name}}</p>
                            <p class="age" >{{person.age}}</p>
                        </div>                      
        </div>

  • Save and upload to AEM - On-demand Portal

Save all the files, drag and drop it to AEM Mobile Packager. Your angular '.article' file is ready. Upload this to AEM - On-demand portal.

When you use AngularJS, you may face issue in adding 'navto' as cross browser call.
Just add 'navto' in aHrefSanitizationWhitelist so that it gets white listed.

Read More:

 Various options in AEM integrated with AEM Mobile On-Demand Portal

 Add/MAP user to AEM Mobile project

 Create Article/Banner from AEM and publish it to AEM Mobile

 Integrate AEM with AEM Mobile

 Create an APP in AEM And Mapping with AEM Mobile On-Demand

 AEM Mobile Interview questions for developers

 Adjusting Home Navigation Menu from AEM Mobile On-Demand portal

Create 'push notifications' in AEM Mobile

Why Push Notifications?

Push notifications are used to re-engage passive users to the app again or conveying information about new content or products which are available in app. These push notifications can be created using the On-Demand Portal or through APIs. A separate Marketing Cloud license also provides different way of delivering push notifications through DPS.

We have different delivery options like, 'notifications which can send the message only to phone users', or by 'scheduling a delivery time'.

Types of push notifications:

Background notifications: Which download a specific item or collection.
Text notifications: Which sends a text message to users to notify something.

Need to create push notifications for Android and iOS independently. Below methods are used for the same.
  • Apple Push Notification Service (APNS) for iOS apps.(Support both text notifications and background notifications)
  • Google Cloud Messaging (GCM) for Android apps.  (Support only text notifications)
Here we will show how to send push notification through android devices.

There are four steps involved in sending push notification in Android.

  1. Configure your app for Google Cloud Messaging using the Google Developer Console.
  2. Configure notifications section of the On-Demand Portal.
  3. Build the Android app with push notifications enabled.
  4. Send the text notification.

Step 1:
Configure Google Cloud Messaging.
1) Go to https://developers.google.com/mobile/add?platform=android

Click on image to see it big

2) Enter values for option as below 'Create a new app or choose an existing app.'
App Name: A name for your app service
Android Package Name:  package name that you use for Bundle ID in On-Demand services (Project settings>Access>Entitlement & Authentication>Bundle ID)

3) Click 'Choose and Configure Services'

4) Select Cloud Messaging, and then 'Enable Google Cloud Messaging.'


5) Create the config file by selecting 'Generate configuration files.'

6) Keep back up of 'Server API Key' and 'Sender ID' values

7) Download the configuration file by clicking on 'Download google-services.json'


Step 2:
Configure Notification Section

1) Go to 'Notifications.'
2) Select the project which you want to update, and click Push Credentials. Then click the Android tab.
3) Select the Android app you created, and then click Add Credentials.


Specify the Server API Key and Project Number (Which you backed up in previous section step 6).

Step 3:
Building an Android app and sign it.

1) Login to On-Demand Portal and re-check 'Bundle ID' which is configured for 'Step 1, Android package name is matching project's bundle id.
2) Go to on demand Apps> App Details Tab, 'Android Push Notifications', then select 'Enable push notifications '


3) Click Upload, select the JSON file downloaded from the Google Developer Console.
4) Build , Sign, install the app on your android device.

Step 4:
Send the text notifications :


1) Click Notifications, and then click Android > Click Create > Text Notification>Details : mention below details
Destination App ID: The app which you need to send notification for
Text Notification Message: Enter the text notification message which needs to be send to users.

2) Click Delivery Options, and specify the following options:
Notification Audience: At present the options are All users, phone, tablet, users who are not app-online for a month.
Delivery Time: Immediate/ scheduled based on time zone,date time.

3) Click Create to send or schedule the message notification.

The Text notifications appear on any Android device in which the app is installed(user must have opted in to receive push notifications).

 Notes:
  • As of now push notification does not allow linking to a specific collection. Cancel option is available for scheduled push notification, if a scheduled text notification has not yet been sent.
  •   If we need to send message to users within the app, we can use In-App Messaging(Which is part of Mobile Marketing SDK). In-App Messaging is a premium product. 

Read More:

 Various options in AEM integrated with AEM Mobile On-Demand Portal

 Add/MAP user to AEM Mobile project

 Create Article/Banner from AEM and publish it to AEM Mobile

 Integrate AEM with AEM Mobile

 Create an APP in AEM And Mapping with AEM Mobile On-Demand

 AEM Mobile Interview questions for developers

 Adjusting Home Navigation Menu from AEM Mobile On-Demand portal

AEM Mobile related default reports in Adobe Analytics


Overview:
AEM Mobile analytics data can be configured to Adobe Analytics(SiteCatalyst/ Omniture) & Analytics Essentials(Mobile Marketing).

SiteCatalyst provides report generation for all levels of Mobile content. Analytics Essentials provides some additional options like in App message,Acquisition tracking, Location and target etc. Analytics Essentials are part of Adobe Marketing Cloud.

AEM Mobile apps are per-configured to report analytics information to Adobe data centers. all app related information like life cycle of the application are saved by default.

Click on image to see it big

Each project in AEM Mobile on demand portal will have a report suite, which is automatically created. Generally mobile app stores information like Path, Dashboards, Favorites, App and Mobile metrics and app-specific items (For e.g. Articles, Collections, Banners).

How to customize AEM Mobile Menu?
As of now the menu is not customizable. In case if customization is required, you need to contact your Adobe Analytics Administrator.

Default reports available in Reports & Analytics tool

Article Reports : All article reports like Article Impressions, Article Clicks, Article Views, Article Scroll, and Social Share.

Collection Reports: All information like Collection and Article Impressions, Collection Open, and Article Click.

Social Share Report: Number of social shares.

Social Share Channel Breakdown Report: Device specific social share referral.

Banner Metrics: Banner impressions, clicks.

Overlay Reports: Hyper link clicks are tracked.

Video Engagement Report: Reports like count, percentage of completion, duration , average time on video etc.

Visitor Profile Reports: Visitor reports like unique visitors, overall visitors etc.

Key Metrics Report: App level reports like installation, launches details etc.

Can we get analytics report for Web Viewer?
Yes . But Web Viewer only supports clicks reports not mobile related swipes or taps.

Read More:

 Various options in AEM integrated with AEM Mobile On-Demand Portal

 Add/MAP user to AEM Mobile project

 Create Article/Banner from AEM and publish it to AEM Mobile

 Integrate AEM with AEM Mobile

 Create an APP in AEM And Mapping with AEM Mobile On-Demand

 AEM Mobile Interview questions for developers

 Adjusting Home Navigation Menu from AEM Mobile On-Demand portal

Adobe Analytics integration for AEM Mobile

Create Sign In in AEM Mobile


Usual mobile apps provides a login screen on launching the application. But AEM Mobile provides this as an app menu. Which means, we need to tap on App Menu> Signin to launch the signin screen. The default collection is displayed on launching the app.

People ask in AEM Mobile, is there any way to provide such option a login screen/window that automatically opens after the splash screen upon app launch. AEM Mobile  directly does not provide such option. They have radmap to provide such option in future.

How can we achieve it manually?
Dynamic Banner is one of the option to do this. We need to provide an HTML Dynamic banner in home screen and on tapping this, the launchSignInUI API can be called from backend. Please note, this API works with both Custom Authentication and authentication via a Direct Entitlement Server. And always there will be a Sign In option avaliable in the app menu.

 If the Direct Entitlement APIs authentication is enabled, then the native sign in dialog will display. Custom Authentications like SAML, OAuth2 or Generic Identity Provider, displays a web view with sign in UX. 

How do you create banners
? Read this blog

Another less preferred option is normal HTML Article,
Create an HTML article with SignIn information and set it as the first item in Top Level Collection. The top level means it will always be the first item that gets displayed to users. ANother option could be creating a link/ button on home article clicking on this launches Sign In. But this also requires an API Call and will work with both Custom Authentication and authentication via a Direct Entitlement Server.

Note: Since we are setting this as top level one, place a logic to display this only when the Sin in is not done. Else it can have bad impact on user experience.
 
Read more on Authentication and Login APIs
https://helpx.adobe.com/digital-publishing-solution/help/identity-providers.html
https://helpx.adobe.com/digital-publishing-solution/help/app-runtime-api.html